Tampilkan postingan dengan label DIY. Tampilkan semua postingan

{Homemade Holiday} Rosette Ring DIY

Kamis, 21 November 2013

 photo IMG_9136copy_zpsbebffa7a.jpg
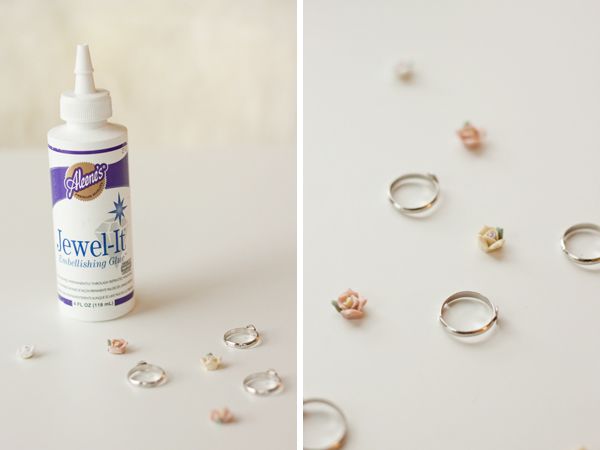
In the spirit of last week's animal ring holder, I thought I would put together an simple gift idea to accompany it — et voila! The rosette ring was born. It's the perfect little add-on to give a girlfriend or pop into a stocking, and it even functions as a last-minute gift if you're in a pinch (oh who am I kidding, when you're in a pinch). So if you want to make a rosette ring of your own, here's what you'll need:

 photo RosetteRingDIYSupplies_zps0f4e4089.jpg
Supplies:
 - Adjustable rings (available at any craft or jewelry supply store)
 - Rosette cabochons (mine are vintage, but there are lots to choose from on Etsy!)
 - Jewelry glue
{Homemade Holiday} Animal Ring Holder DIY

Kamis, 14 November 2013

 photo AnimalRingHolderGiftDIY_zps945df5cb.jpg
The holidays have a remarkable way of sneaking up on me each year, and all those lofty goals of baking, crafting and general merry-making often go unactualized. That's why I thought it would be fun (and mutually beneficial for readers like me!) to launch a homemade holiday series consisting of a DIY gift idea each week to get your yule-tide juices flowing (so to speak). First up? The Animal ring holder.

 photo AnimalRingHolderDIY_zpsbe85c352.jpg
I love giving loved ones jewelry, but it never dawned on me before that a playful jewelry holder could be just the ticket to up the ante when gifting baubles. So off to the dollar store I went to pick up some plastic animals to make this simple, yet impactful gift idea.
 photo IMG_8506_zps8fd92acf.jpg
Simply spray paint your animal any colour you wish, and adhere it to a pretty plate (mine came from Home Sense) using powerful glue... It's as easy as that! Top things off with a pretty ring or some sparkly earrings, and your friends are sure to love you all the more this holiday season! photo IMG_8546copy_zps8c7dc067.jpg
I hope you enjoyed this new DIY series — stay tuned for more fun projects in the weeks to come! xx

{Halloween Week} The Witching Hour

Senin, 28 Oktober 2013

 photo IMG_9502_zps3f30394a.jpg
Dress- Suka Clothing | booties via Ordinary People | clutch- DIY | skull necklace- Zara | ring + bracelets- Forever 21


 photo IMG_9492_zpsac3484e4.jpg  photo IMG_9436_zpsde4ef4b1.jpg  photo SukaDressDetails_zps0717c950.jpg  photo IMG_9447_zpsc06acd10.jpg  photo IMG_9497copy_zps8339ddf9.jpg  photo IMG_9403_zps1847c993.jpg
Hello and welcome to another theme week! First up in our Halloween lineup is this witchy, goth-inspired dress from Edmonton label Suka Clothing. I've had it hiding in my closet for over a year now, but didn't have occasion to wear it until now. Something about the print and midriff cut-outs really spoke to me, especially when planning a Halloween-inspired look to kick off the week. And when paired with this Kenzo-esque eye clutch, pointy booties and skull necklace, I'd say the witching hour is officially here. xx

Photos by Andrew Tarver

{DIY} Easy Statement Earrings

Selasa, 22 Oktober 2013

 photo statementearringdiy_zps377f25a9.jpg
I was craving an easy DIY this weekend, so I decided to whip out my trusty Shrinky Dinks and try my hand at a simple, lucite-inspired statement earring. I have a hard time wearing larger earrings because I find them too heavy and taxing on my lobes, so this fun, lightweight solution really appealed to me. Read on for instructions!

 photo StatementEarringsDIY_zps47707792.jpg  

 Supplies: 
  • Shrinky Dinks (available at any craft store)
  • Scissors
  • Holepunch
  • Paper + pen
  • Jewelry glue
  • Decorative gems
  • Jump rings + earring hooks 
 Instructions:

1. Trace your shape onto a Shrinky Dinks sheet, making it three times larger than your desired end result.
2. Cut out the shape, taking care to even out the edges.
3. Punch a small hole into the top of your shape, then bake the shapes according to the instructions on the Shrinky Dinks package.
4. Once cooled, start gluing decorative gems and pearls onto the surface of the earrings.
5. Secure the earring hooks to the base with a jump ring.
6. Give yourself a pat on the back — you're done!

 photo IMG_9176_zps11abcfdc.jpg

{Recap} September Favourites...

Minggu, 29 September 2013

{DIY} Kenzo-Inspired Eye Clutch...

Selasa, 24 September 2013

 photo Kenzo-InspiredClutchDIY_zpsd29769b8.jpg 

I'm a big Kenzo fan, and even though I still have tiger fever, I was pretty excited by their new eye motif... Plus the fact that I could quickly and easily recreate the clutch for a whole lot less didn't hurt either.

Wanna get your Kenzo on too? Grab your art supplies ladies, because this DIY is as fun as it is simple!

Supplies: 
  • Simple black clutch (I got mine from Forever 21)
  • Black sharpie
  • White acrylic paint
  • Thin brush
 photo KenzoEyeClutchDIY_zps69792eaf.jpg  

Start by drawing the eye shape on the clutch using a black Sharpie (Note: Don't worry about making mistakes at this stage — you'll be covering over the marker soon). Using small, even brushstrokes, start painting in the whites of the eye with your acrylic paint. Give the clutch a second coat of paint, and once your design is completely dry, clean up any smudges with your Sharpie... Easy does it.

 photo details_zps41724cc4.jpg
I hope you guys enjoyed this DIY project, and as always, thanks for reading! xx

{Beauty} Ikat Nail DIY...

Kamis, 19 September 2013

 photo IkatNailDIY_zpse4aac04f.jpg

Who's ready for the easiest DIY mani ever? I've done the whole ikat nail wrap thing in the past, but I never realized just how easy (and inexpensive) it is to recreate the look yourself. It's literally as easy as one-two-three!


 photo IkatNailDIYGuide_zpsc918841e.jpg 

Just paint your nails a bold base colour (like red!), and once that dries, make narrow, asymmetrical shapes in white. Using a small brush, paint your third colour (blue anyone?) in the center of the white shapes, finishing it off with a top coat... What a cinch!

Thanks for reading friends, and if you have any fun, easy nail DIYs of your own, I'm all ears! xx

{Inspiration} Three DIYs To Try...

Selasa, 10 September 2013

 photo 3DIYsToTry_zps6e0e21f0.jpg

If there were more hours in the day, I would spend them DIY'ing up a storm... Until that happens, however, there's always Pinterest for daydreaming purposes. I scratched the galaxy pendant DIY off my list last night by making one for a friend, which means there might be a lips clutch (an oldie but a goodie!) or spotted shoe project in my near future... But if not, hey — one out of three ain't bad either.

What projects are you guys working on? xx

Galaxy pendant DIY | spotted shoe DIY | Lulu Guinness-inspired lips clutch

{DIY} Pearl Embellished Booties...

Rabu, 28 Agustus 2013

 photo DIYpearlembellishedbooties_zps306efae8.jpg

Fall is coming (yippee!), which means that I'm deep in closet re-evaluation land... You know, purging, cleaning and identify gaps in my colder-weather duds. So when I came across these somewhat tired booties from last year, I decided to jazz them up rather than just get rid of them. The result? A fun, updated look that I can't wait to throw on throughout the season.
 photo IMG_3231copy_zpsb6a74ce1.jpg

The supplies:

- Strong adhesive
- Flat-backed pearl embellishments
- Booties

  photo IMG_3236_zps5e09b614.jpg

1. Clean and dry the heel of your boot thoroughly for maximum adhesion.
2. Start applying the pearls with small dabs of glue, holding down to secure each pearl.
3. Let boots dry for at least 24 hours before wearing, allowing your embellishments to fully cure.

 photo IMG_3251_zpscd415b06.jpg
Thanks for reading, friends! xx

{Summer Week} DIY Embellished Sunnies

Selasa, 20 Agustus 2013

diysunnies copy
Sometimes a girl just needs a little oomph, and what better way to inject some intrigue into your style than with some embellished DIY sunnies? It's a quick and easy solution for breathing new life into a summer staple, and I couldn't love the end result more...  Tres chic!

{ Just add some embellishments with strong glue and let your imagination be your guide... }

IMG_2018
{ Such a fun way to liven up an old pair of forgotten sunnies! xx }

{DIY} The "Statement" Clutch...

Rabu, 31 Juli 2013

 photo dontyouforgetaboutme_zps458f9104.jpg

It's no secret that I'm a huge fan of the 80's, so when images of cute, statement-packing clutches kept popping up on Pinterest, I couldn't help but make my own version using a lyric from the all mighty Simple Minds... Plus you probably wouldn't want to leave your clutch behind, so it seemed kind of fitting.

Want to personalize a clutch of your own? Grab your stencils and sharpies ladies, because this one's a breeze!


 photo tracecopy_zps00e455ed.jpg  photo IMG_9999copy_zps46bcb3c3.jpg  photo dkljfwcopy_zpsa2d236ef.jpg

{DIY} The Repurposed Necklace...

Rabu, 24 Juli 2013

 photo IMG_9078_zps3ade417e.jpg

Last night I realized that it had been waaaay too long since I DIY'd (stupid work and life getting and, well, Netflix getting in the way), so I put my thinking cap on and ransacked the apartment for project ideas. After looking through a cramped jewelry drawer, I quickly realized that I have far too many earrings that go unworn, and — light bulb moment — why not turn some of those old baubles into a necklace?!

Like what you see? It's the easiest! Here's the drill:

 photo IMG_9028copy_zps3fa430b1.jpg

The Supplies: 
 
- Old earrings
- Chain
- Jump rings
- Tools

  photo repurposeddinner_zps710909f7.jpg

The Steps:

1. Detach all the components you plan to use from your earrings.
2. Take special care to remove all traces of the earring posts — Trust me on this one.
3. Collect all the pieces you plan to use and mock up where they're going to sit on the chain.
4. Attach your first piece at the centre of the chain using a small jump ring.
5/6. Continue attaching your components until the necklace is complete.

** Marvel at how easy this was and what a crafty-crafterson you are... You've earned it. 

 photo IMG_9064copy_zpseb0a2ec0.jpg

Ta-daaaa! A repurposed necklace to call your very own... Tres chic! Thanks for reading, friends! xx


 photo IMG_9072_zps8bc87971.jpg
 Photos by Andrew Tarver
 
Diberdayakan oleh Blogger.